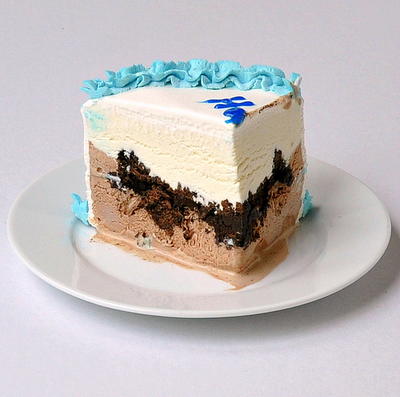
Copycat Carvel Ice Cream Cake

From the Blogger:
"If you thought a Carvel cake couldn't taste better, then how about a fresh ice cream cake that tastes SO much better and is made with love!
This cake tastes so darn good. My husband, in-laws and I devoured it and decided that it was one of the best cakes I’ve made and it needs to go into the birthday cake rotation. My daughter proclaimed it, “The best cake EVER!”
Everything is made from scratch so you definitely have the great taste with the ingredients alone, but the BEST part is it really tastes like a Carvel cake. Not one of those copycat recipes that kind of taste like the original. This did not last long in our house and I had to hurry to take a picture of it."
Click here for the copycat recipe
Serves15
Cooking Vessel Size9-inch Sprinform Pan

Ingredients
- 1 quart chocolate ice cream, softened
- 1 quart vanilla bean ice cream, softened
- 9 ounce chocolate wafers
- 1 container (7.25 ounces) Magic Shell
- 3 teaspoon unflavored gelatin
- 3 tablespoon cold water
- 3 cup heavy or whipping cream
- 9 tablespoon confectioners sugar
- 3 teaspoon vanilla extract
Instructions
For the Cake
-
Take a 9-inch springform pan and place it in the freezer for 30 minutes.
-
In a food processor, pulse the chocolate wafers until they are coarse crumbs. You dont want big chunks, but fine crumbs will form big chunks of crunchies which you dont want. Add the Magic Shell topping to the chocolate wafer crumbs and mix well. This will become your crunchies!
-
Pour your softened chocolate ice cream into the springform pan until you reach the halfway point on the pan. Then, place your crunchies on top of the chocolate ice cream. You will want to spread them out in an even layer and keeping them an inch away from the outer edge. Place the pan in the freezer and allow to set for at least one hour.
-
Remove the pan from the freezer and pour in your softened vanilla ice cream, taking care to create an even layer on top. Freeze for several hours or overnight.
-
Remove the pan from the freezer and open the springform pan. Take a knife of a cake spatula and slide it alongside the underneath of the cake to remove the bottom layer. Take some of your whipping cream and spread evenly over the entire cake. Place the cake in the freezer and allow to set for 30 minutes.
-
Take the cake out of the freezer and decorate the cake with the remaining whipped cream. Taking care to smooth it out nicely and pipe and decorate how you wish. Place the cake in the freezer to set until ready to serve.
-
When you are ready to serve, remove the cake from the freezer and allow to thaw for 10 to 15 minutes before serving.
For the Whipped Cream
-
Put your mixing bowl and whipping attachment in the freezer and allow to cool.
-
Mix the cold water and gelatin in a small dish. Wait one minute and then heat the gelatin mixture in the microwave for 30 seconds to allow it to become liquid. You will use this to stabilize your whipped cream.
-
In the cold mixing bowl, beat the cream until peaks form. Start off slow and gradually increase the speed.
-
While the mixer is still on high speed, add the sugar. Next, add the heated gelatin. Finally, add the vanilla extract.

